The first post for this project (the quilt top) can be found here.
Anybody remember when I said I’d be putting this project on hold for a couple of weeks while I sourced supplies? LOL yea, me either—but according to my April 2020 post that was apparently my original intent. Here we are almost a year later, and I’ve finally managed to complete this project.
In all fairness, this IS my major pandemic project, and ain’t that just the way this pandemic has gone?! Back in April of 2020 it was all still fun and games. “Oh yes, why not start this overly ambitious quilting project with zero experience? I have all this free time now, what fun I will have!”
Eleven months later, here I am with gray hairs on my head, and much less naïve about what this quilt and the pandemic had in store for me—both of which I wildly underestimated. Of course, the gray hairs probably have less to do with either and more to do with me turning thirty this year, BUT I DIGRESS (I’m kind of proud of them, tbh).
You may also recall from my first post that I declared the theme of this quilt was “Wingin’ it,” and that has definitely held true through the second leg of this project. While this was mostly on purpose, I can’t say I recommend it. I found the scope of the project so overwhelming when I started, that to be completely honest—I just decided not to think it all the way through. Since it all felt like a giant mystery, I said to myself, “one step at a time, tootz. We’ll deal with the rest later.”
So I finished my quilt top, it was real cute, and I found myself suddenly back on square one—with neither the knowledge (or the supplies), to carry on. I knew I needed to get an A-Z overview of quilting, and for this I took to Craftsy.
Normally I’m a big fan of Craftsy, but I can’t say their Quilting start up class was particularly helpful in this endeavor. The biggest questions I needed to answer were 1.) how to baste my quilt layers, and 2.) how to actually quilt. While the class at least pointed me in the right direction towards finding the answers, I didn’t love their recommended methods. For basting, the instructor taught how to use basting spray. Not only did this seem like something harder to do well than it looks, I can’t help but feel that aerosol cans are the antithesis to the spirit of quilting. Like, loads of people make entire quilts by hand—is there really no other way?!
I took to Instagram to confirm whether my deep suspicion of basting spray was well-founded, and the responses I got were resoundingly anti-spray. Instead, I was pointed to this pin-basting method. While it also seemed like a pain in the ass, it felt more approachable and less ridiculous. I went ahead and bought myself 200 curved pins so I could get started.
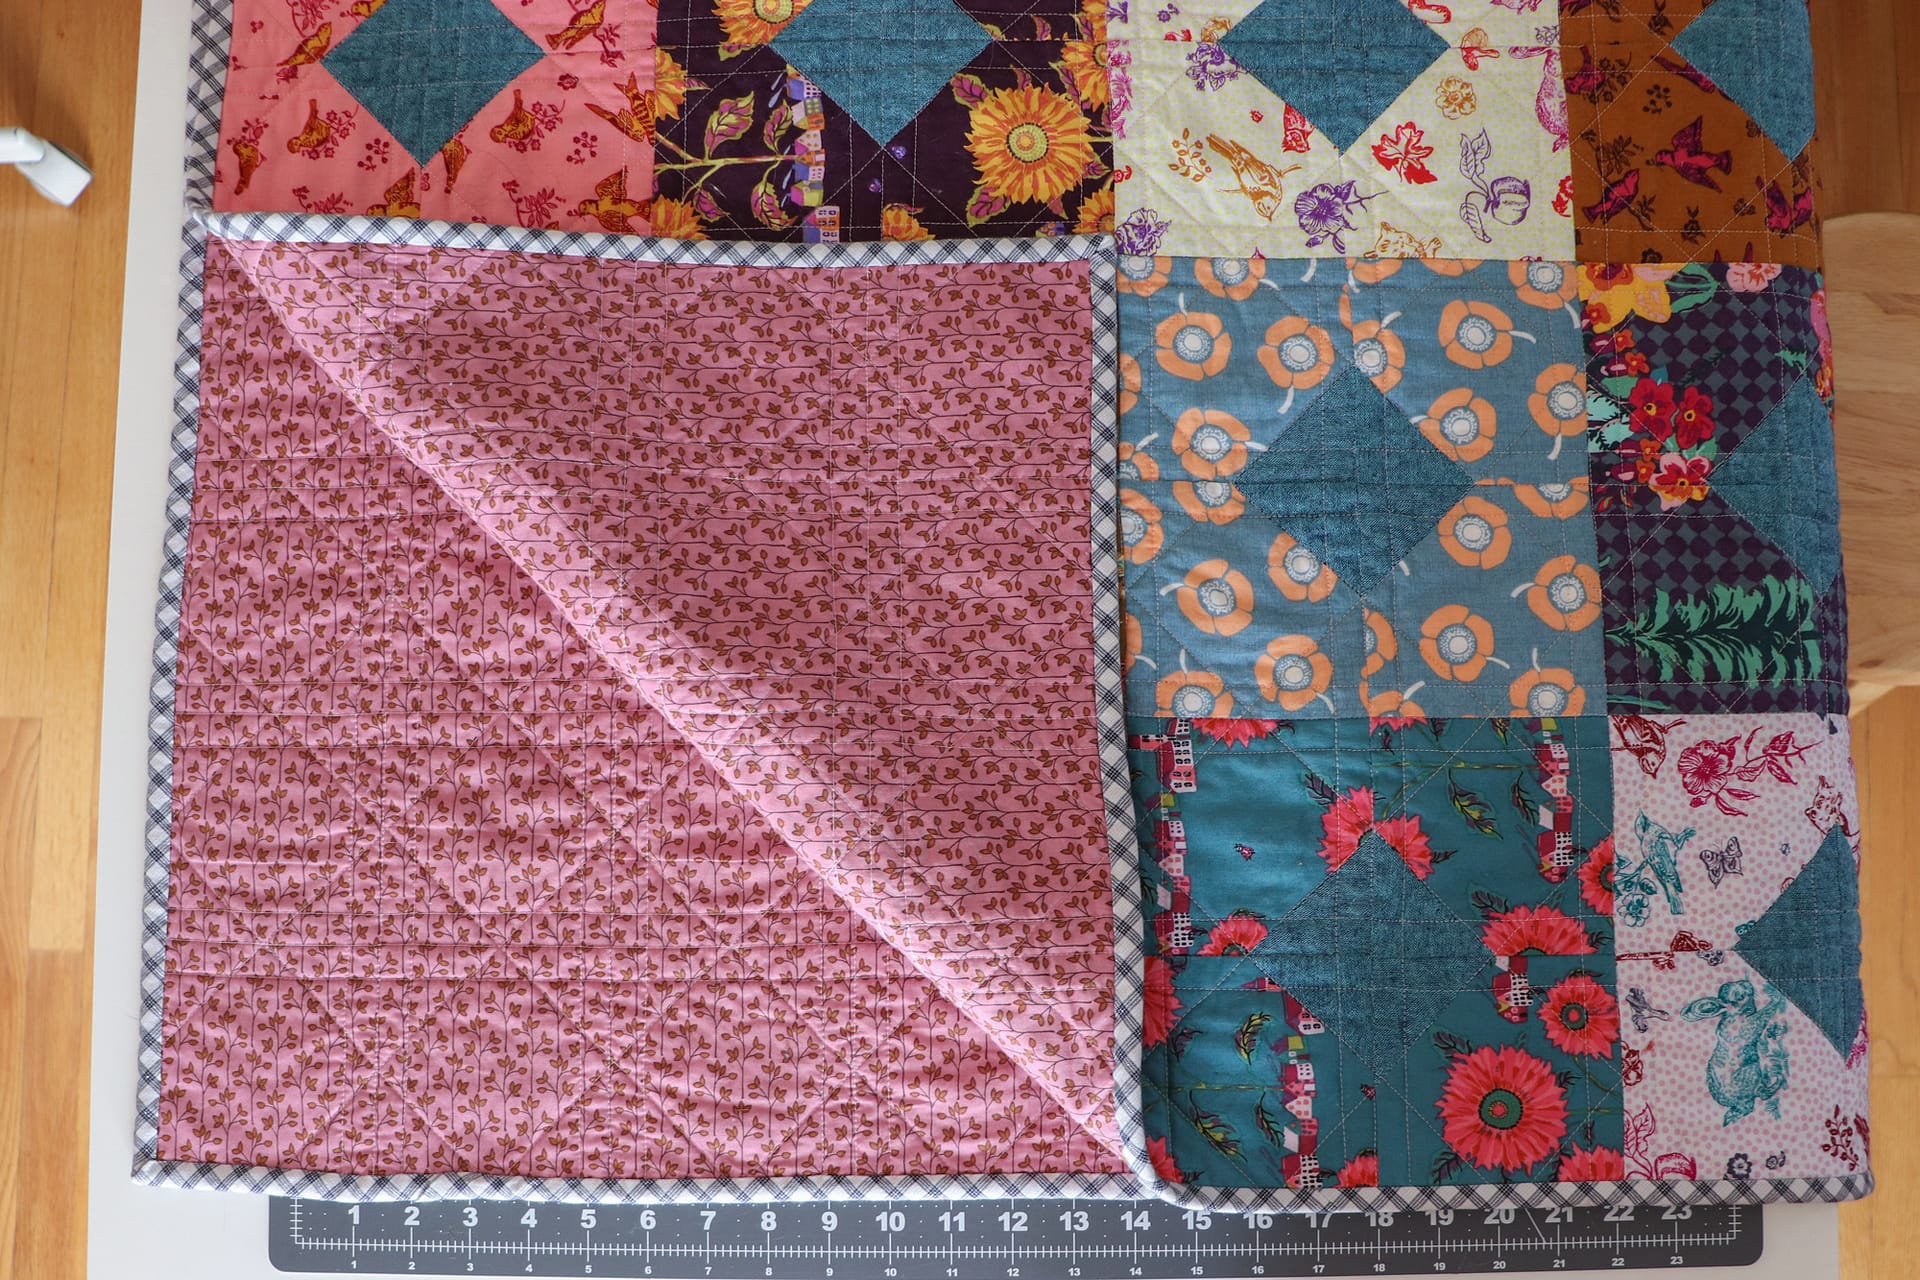
Now, you can’t baste a quilt without backing fabric, and this was another gaping hole in my quilt project plan. You’ll notice that I used a black and white checkered fabric for my binding, but in fact my original intention was to use this fabric for my backing. However, I never bothered to calculate how much backing fabric I needed, nor did I compare this number with how much of this fabric was actually in my stash. When I finally got around to doing this (the eve before I planned to baste everything), I had to nix my original plan. Instead, I decided to use the fabric for my binding, which I’m ultimately happier with.
This little snafu unfortunately put my quilt on hold indefinitely. It wasn’t until I got distracted with making my christmas tree skirt (which coincidently, I ALSO forgot to purchase a backing fabric for), that I took the time to select and buy what I needed.
Dear reader, we’ve now entered the month of January in this journey, and with my confidence up from my recently completed tree skirt quilt, I decided it was time to make another attempt at basting my quilt. So what do I discover that late Friday evening when I pull out my backing fabric? I was once again . . . short on fabric! D’oh!
Instead of buying the four yards I needed for my backing, I only bought three. I put my project on hold again (!) while I waited for another two yards of this fabric to ship (thank goodness it was still in stock). If you haven’t already guessed, this quilt was quite expensive, and multiple shipping fees didn’t do anything to help with that.
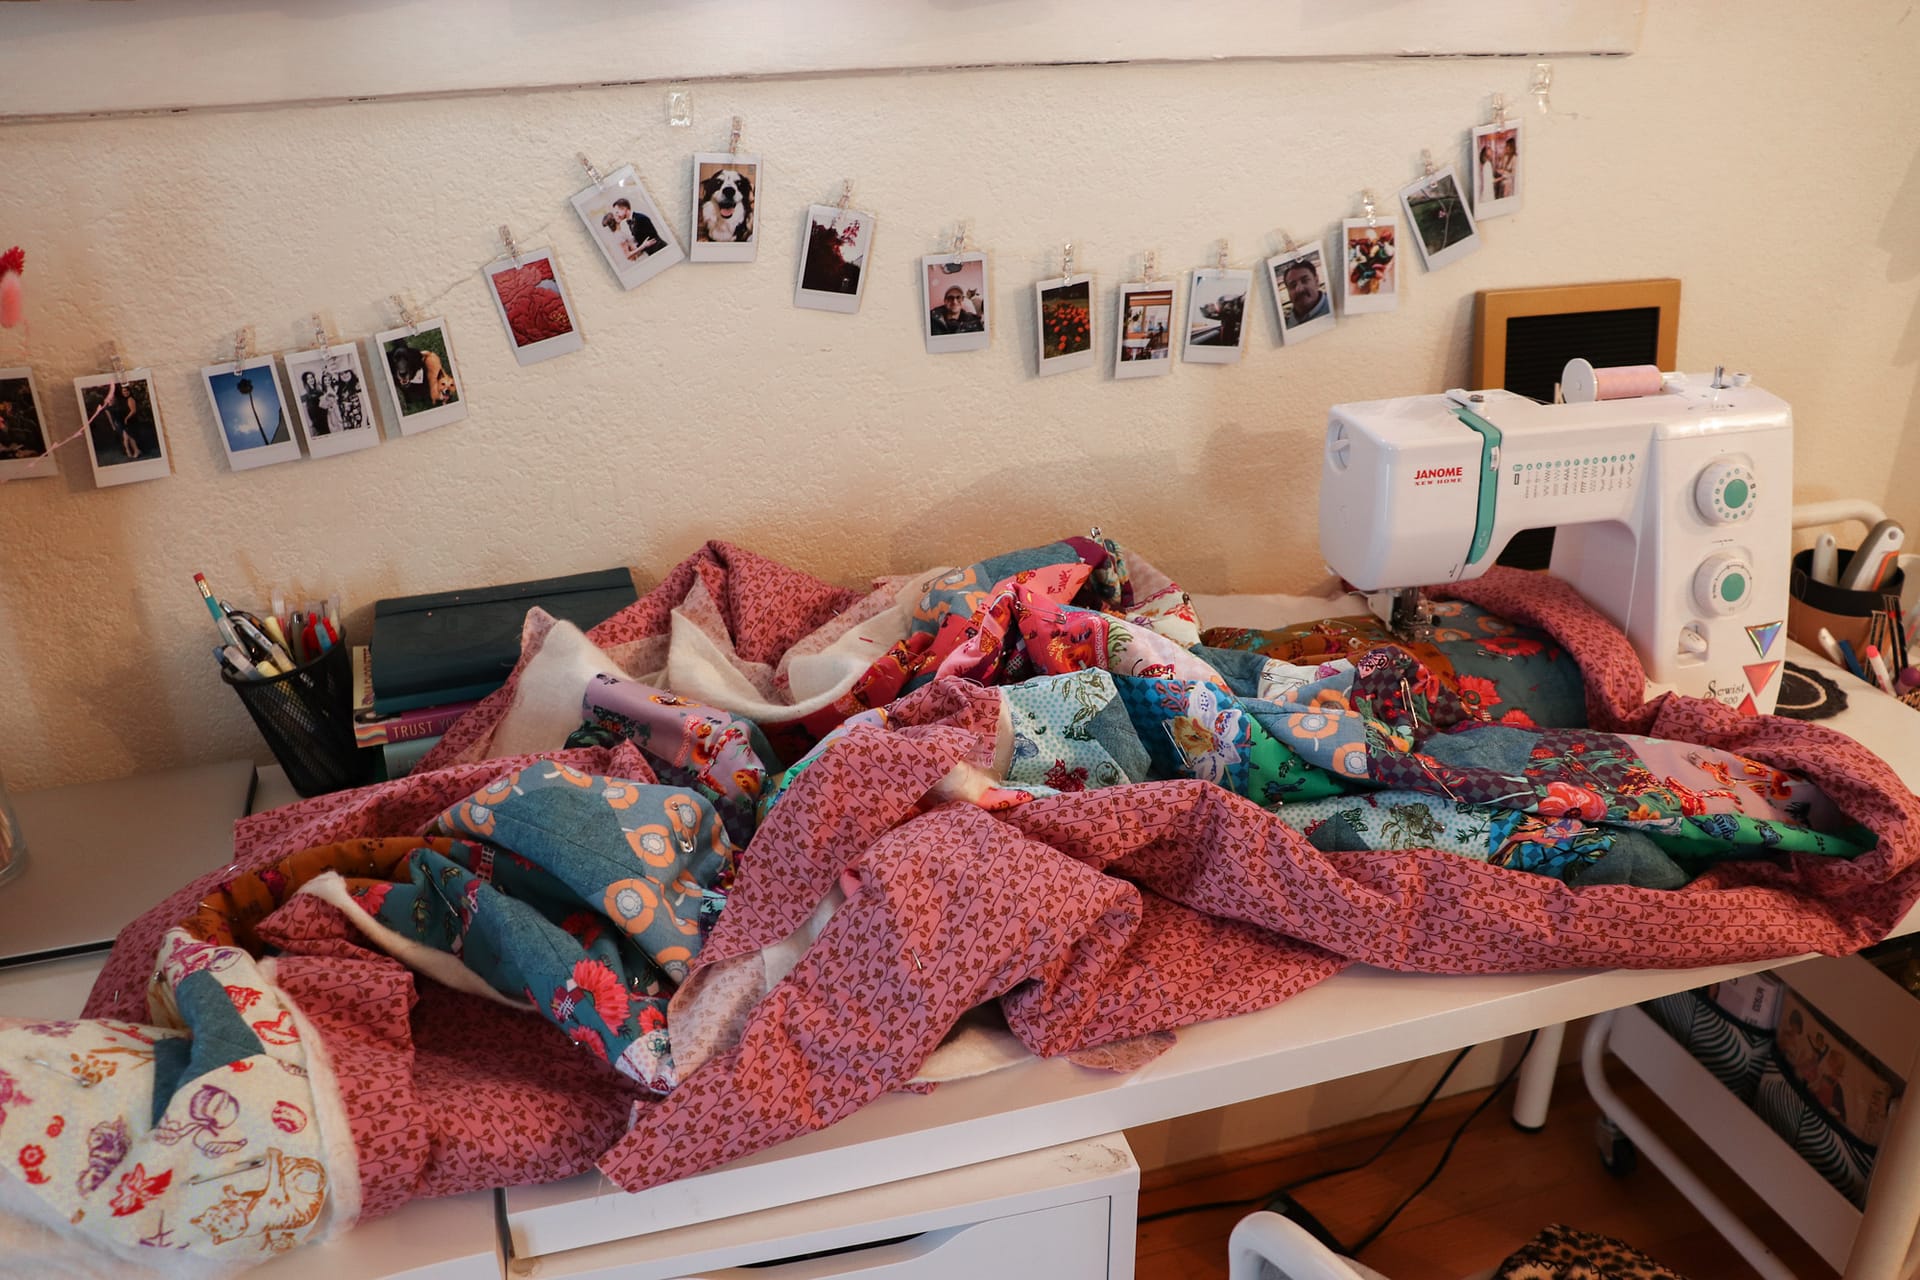
With the correct amount of backing fabric finally in hand, I was able to take a Saturday to baste all my quilt layers together. My sewing room is the only spot in the house with enough open floor space to accomplish such a task, but in order to make it so I had to dissemble my cutting table and move it to another room (I should have but did not take pictures of this step—sorry!). This is the main reason I reserved a weekend to baste my quilt, because my dogs have certain expectations about spending the work days that room with me, so couldn’t have the floor tied up with a quilt for too long.
I won’t lie, crawling around on the floor is a task I hate, and I have a hard time not getting super frustrated when I need to do it. Maybe it’s bad ergonomics or a lack of strength in general, but my back aches when I’m finished (like seriously, folks who do this regularly—how?!). I took a more strategic approach this time, and instead of powering through I set timers for 25 minutes. When they went off, I got off the floor to take a brief break. I also bought myself a set of knee pads, per a reddit recommendation. My back was much happier for it, and I still managed to finish basting in under two hours.
As for the quilting, Craftsy recommended some free-motion nonsense that the n00b and perfectionist in me had no interest in taking on. I’ll be honest, I thought my trusty copy of By the Bundle would show me how to quilt, but it turns out that piecing and quilting are two very different things. When you buy a quilt pattern or book, it’s really the instructions for piecing that you’re getting. As for the quilting? It’s kinda like the wild west.

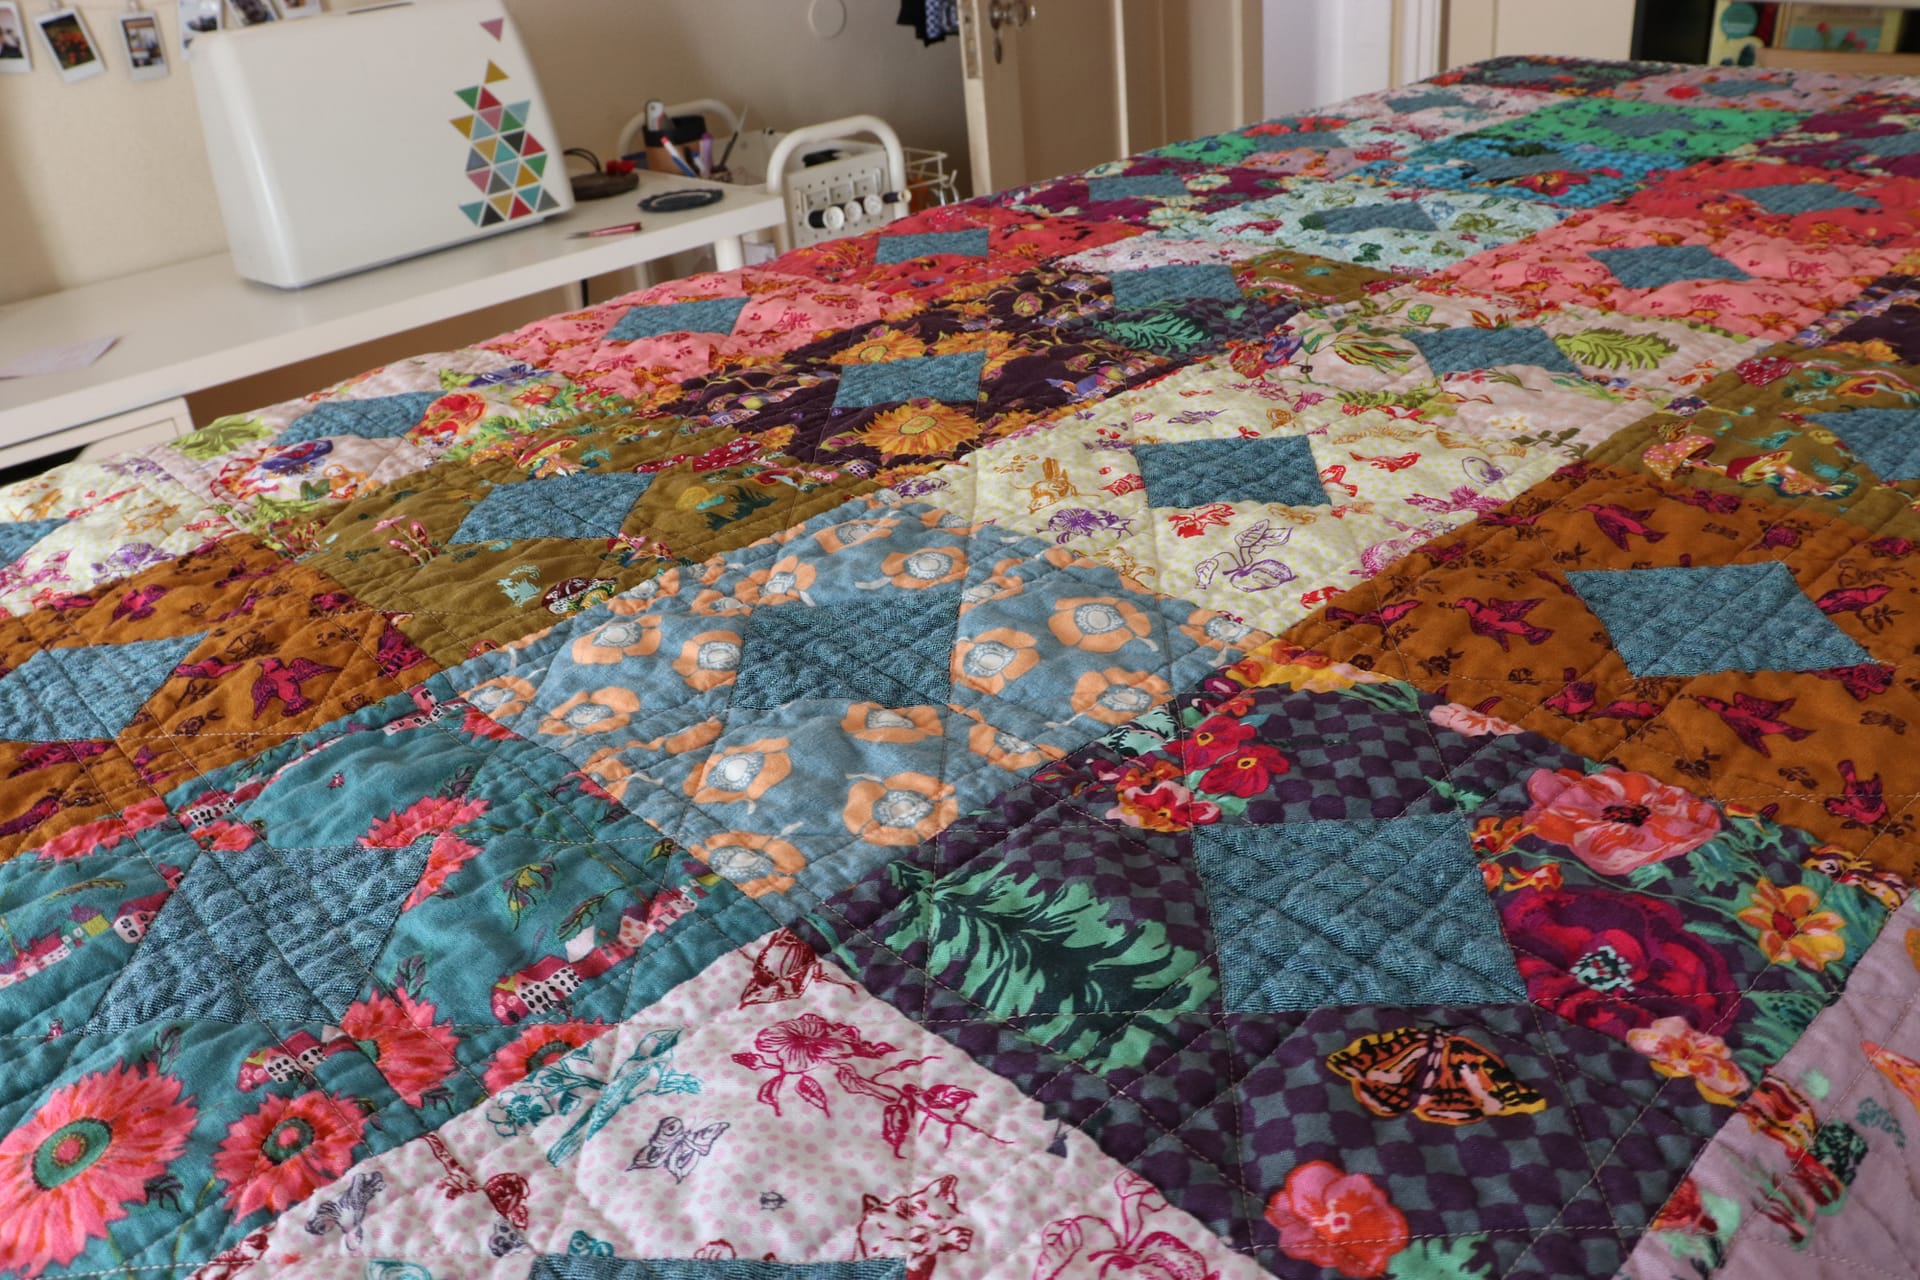
Or at least, this quickly became my impression when I could find a nary a set of instructions anywhere. Luckily, I found this article which gave me a pretty good run down of the basics. The website may look old, but the information is gold, and I followed the instructions to a T until I had stitched in the ditch of all my major seamlines.
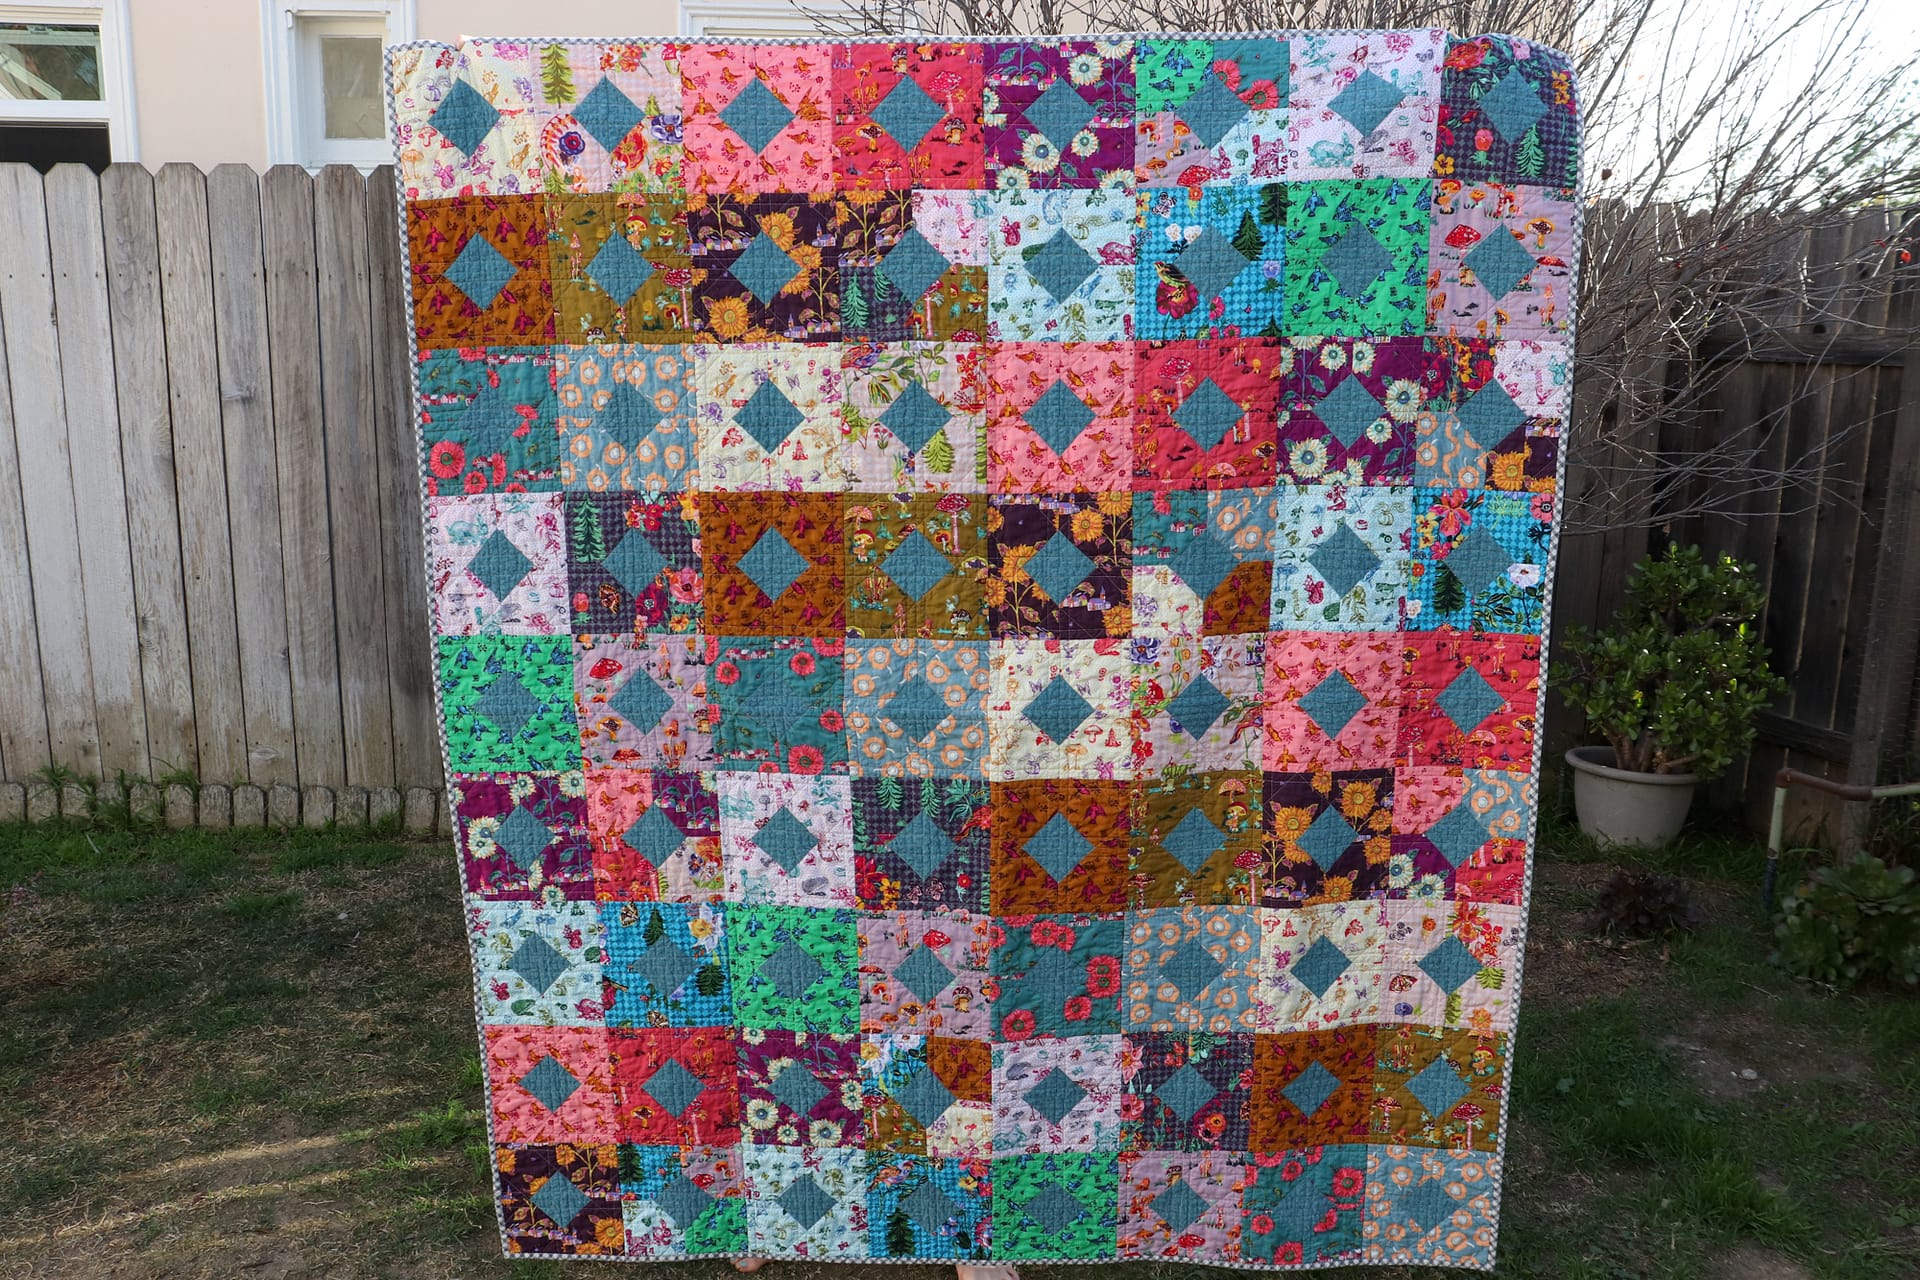
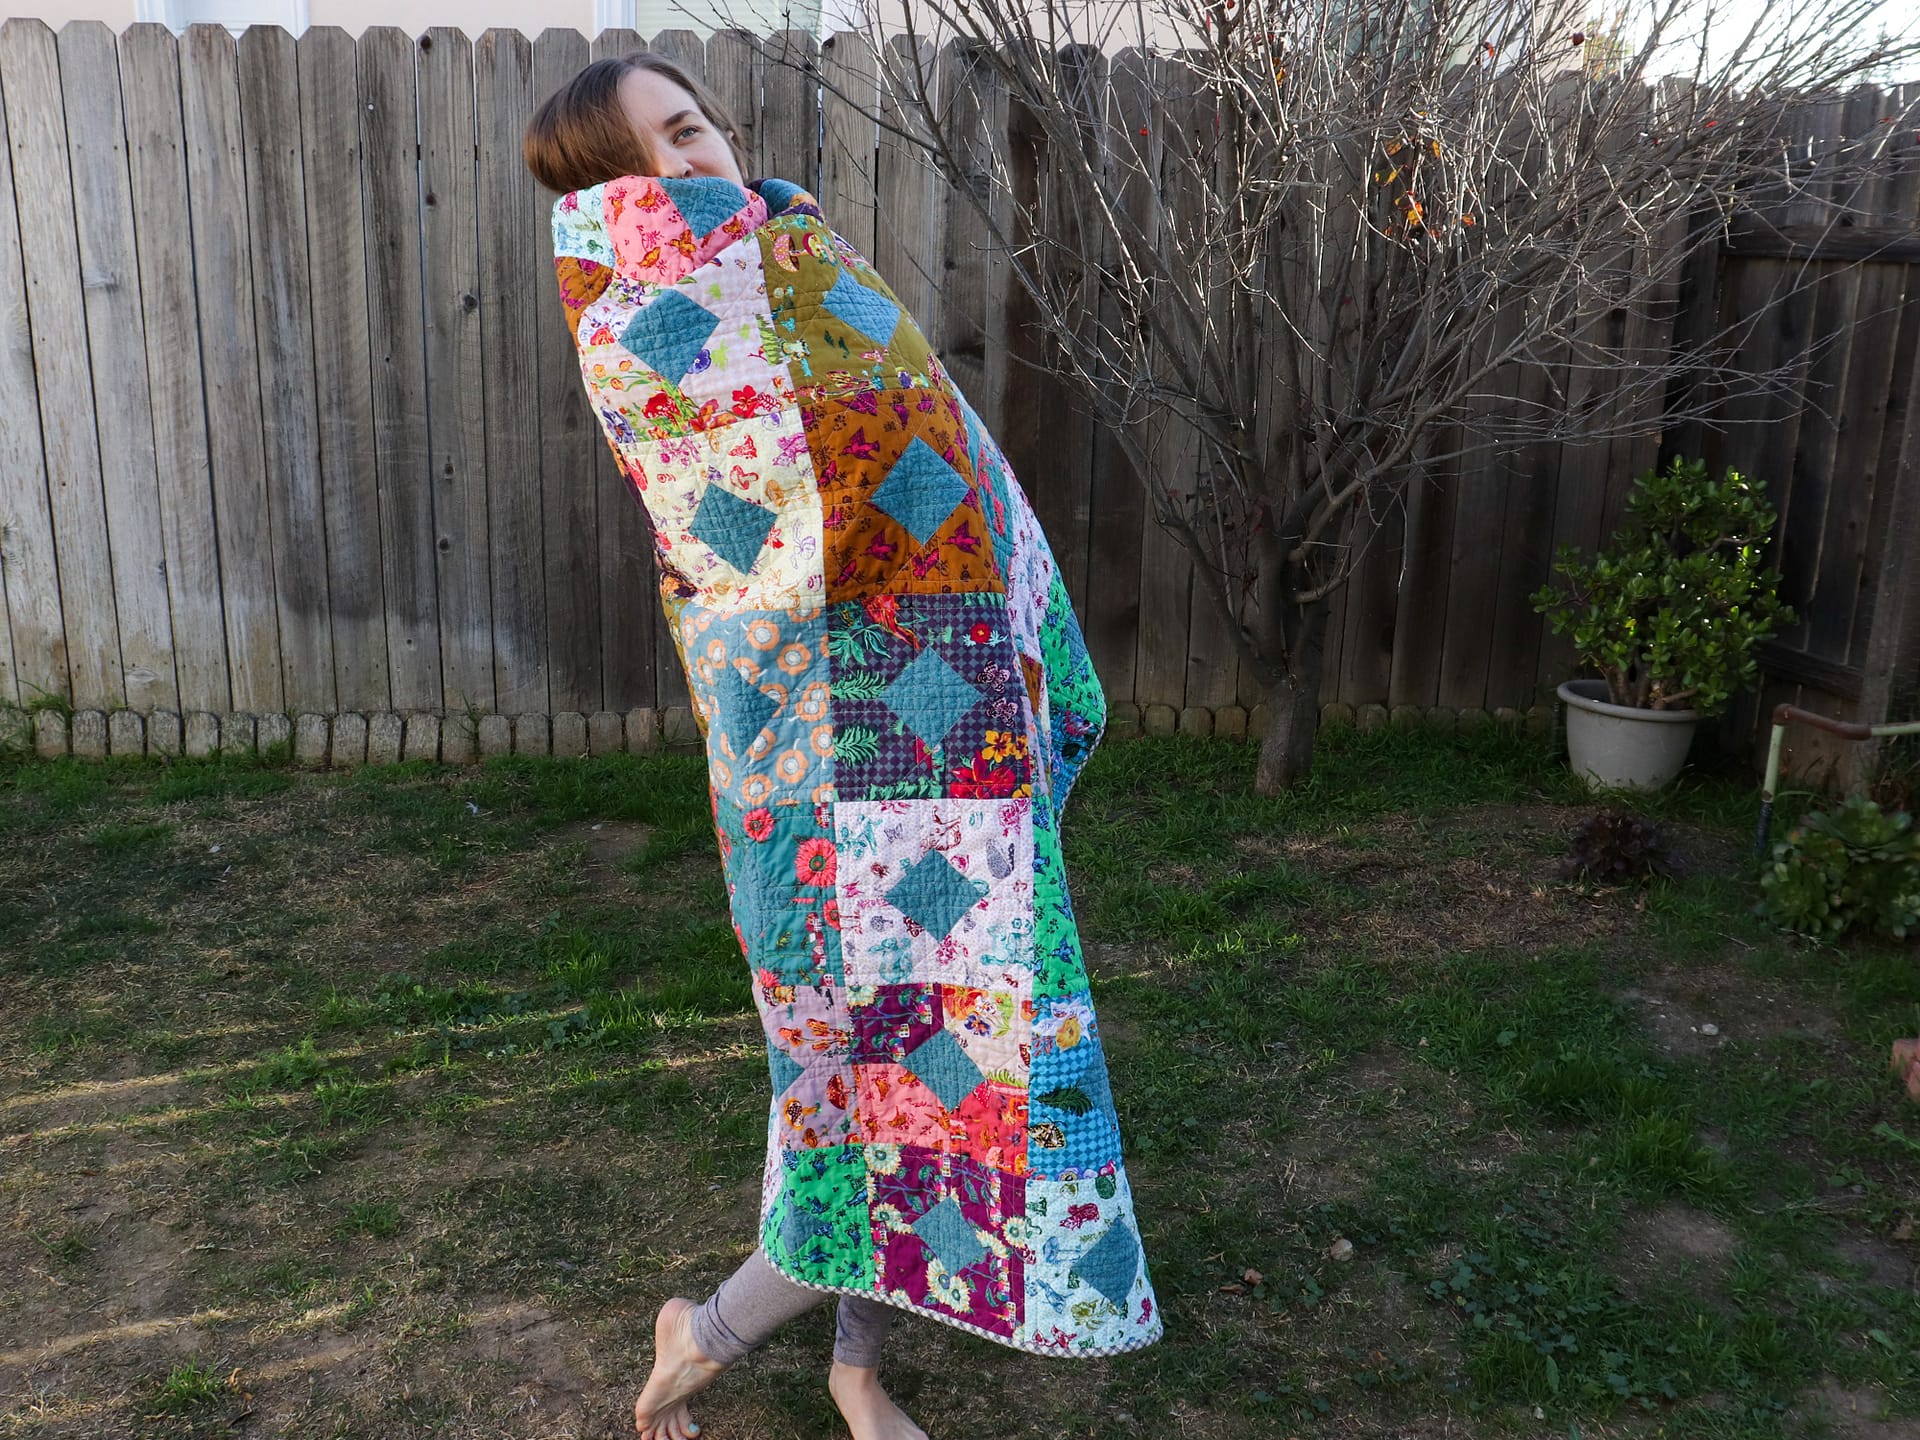
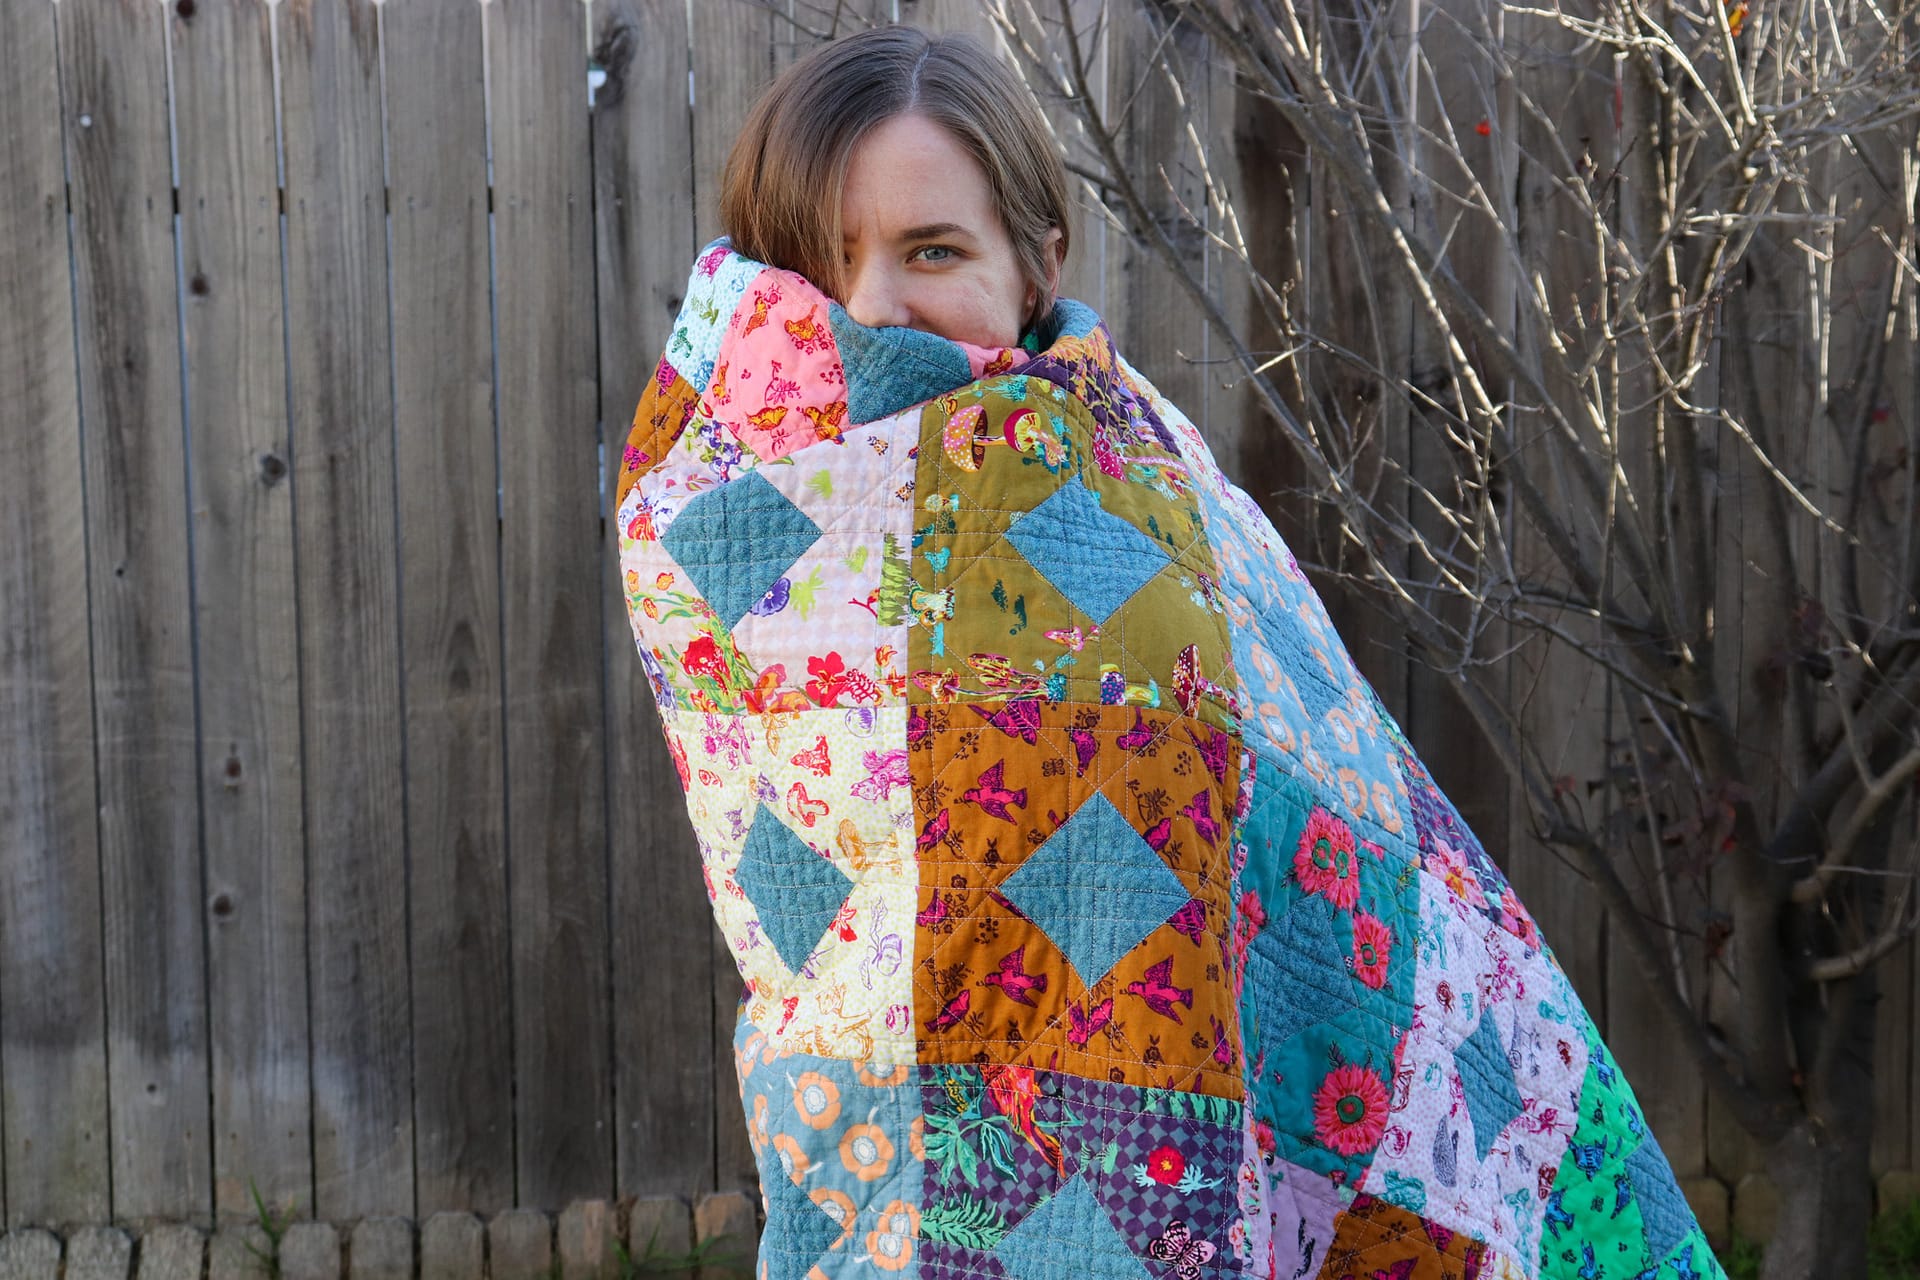
At this point I could have stopped (and I did strongly consider it), but my husband convinced me to keep going. I studied the sample photo of the original quilt very closely, and decided to mimic the design as best I could. I am so glad I kept going, because the extra quilting really brings out the diamond shapes in the quilt, and it gives the entire quilt a much nicer (and flatter?) hand feel.

I would be remiss to mention that it was completely ridiculous of me to start with a full size quilt straight out of the gate. Boy, was I not pleased with my decision those first few rows of quilting. Granted, it did get easier as I got used to the mechanics and managing such a massive amount of fabric—but if you’re contemplating starting your first quilt project, do yourself a favor and pick a smaller project.
Attaching the binding was fairly straightforward process, and I used this Youtube tutorial to hand sew it. I did consider skipping the handstitching (as I am want to do), but the finish is definitely nicer when it’s done by hand. At this point I’d already invested SO many hours—what is just two or three more? I also find hand sewing to be a nice break from regular sewing. It’s more portable and I can do it from the couch!
Last but not least, the final wash. I did not pre-treat any of my fabrics or batting, in the hopes that it would crinkle up in the dryer. Of course, when it came time to actually throw it in the dryer, it was absolutely terrifying—but I’m pleased to report that I’m delighted with the result! If I were making something like a table runner I’d probably try to preserve the smooth texture of the fabric, but I love the crinkle effect on a blanket. It has the added benefit of hiding my lumpy stitching, because everything is lumpy!
Anywho, this post has gotten long enough (congrats and thank you if you’ve made it this far), but it’s only fitting for a project that took me so long to complete. I am relieved and happy to have this quilt behind me, and I can’t wait until the same true of the pandemic, too.

The Details:
- Fabric:
- Front: Nathalie Lete Conservatory Fat Quarter Bundle + 1 m of mystery Japanese cotton
- Back: 4 yds of Elizabeth Hartman Berry Season in Rose
- Binding: mystery discount poly/cotton blend
- Pattern: Diamonds and Squares Quilt from By the Bundle
- Total Cost: $206
- $131 for the fabric (including an extra yard and two rounds of shipping)
- $10 for cotton batting
- $20 for safety pins
- $15 for knee pads, lol
- $5 for thread
- $25 for By the Bundle


Tamsen
this is my favorite post ever. LOVE your quilt. All the fabric choices are just gorg and I love the binding and backing too. I am glad pin basting worked out ok! I think ultimately, there’s no way of getting around the worst step of the quilt (basting) but knee pads are smart! The quilting is PHENOMENAL. That part is always the hardest for me (and it seems so… weird to me that people send their quilts off to be professionally quilted at the end). I hand quilted my last one and loved it, and plan to hand quilt the current quilt too. Machine quilting is so difficult with all the fabric bunching up and the weight of it on you… I think if I had a better machine or table set up, it would be better. Also, I think your quilt seems cheap actually with the costs all added in. I don’t think I’ve ever gotten away with making a quilt for less than $250. Maybe that baby quilt was less… Just saying – quilting is so expensive! My dad told me I could probably sell my quilts at one point (which is nice of him to say, but he’s my dad so you know, biased a tad) and I was like — people couldn’t AFFORD to buy these hahaha. Anyways, lovely lovely quilt. It feels so cozy to me and dear – the fabric choices are just perfect. Great first quilt!!!
miranda
Gahh thank you Tamsen! That means a lot coming from you. Your quilts are always so beautiful and I think your dad is right – even if he is biased! But yea, I don’t know how you get around the price point. My grandma invested in an Amish quilt a few years ago, totally hand stitched and it was only $750. 😮 I’m sure the materials cost less than the ~trendy~ boutique quilt shop stuff, but I thought it would have been four figures for sure!
Anywho, once I got the hang of it machine quilting was quite nice and relaxing. But at first I definitely had the thought, “Ohhh THIS is why people have things professionally quilted.” 😂 Straight lines are manageable but unless it was something smaller I don’t think I’d be brave enough to try anything fancy. I also understand now why people invest in machines with large beds. Hand quilting is GORGEOUS and something I’ll have to try at some point (maybe with a wall hanging, lol). I can’t wait to see your next one!
Lia
It’s absolutely gorgeous! And if we hand-wave away the cost of labor, then about $200 for a handmade quilt is grand larceny!! I love the bronzey tones and the pinks and the dark blue together…and every other color too, come to think of it. My arms are aching just thinking of manipulating it through a machine, but it looks completely worth it. You must be (justifiably) thrilled!
grape
does not look like a first time quilt to me, you must be very talented
miranda
Thank you! 🙂