New year, new me! Which in this case, means catching up on everything I didn’t get to in 2019 – like sharing my Dawn jeans with ya’ll. I finished these pants back in October but only just got to taking the photos last week. Part laziness, part cold weather (I’m so baby), and part the fact that these are white pants and I have a black dog – hence, they are almost always covered in dog hair.
The fact that these are broken in is fine though, because the fit on these jeans at two months is not the same fit on these jeans at two hours, especially in the back. I knew these had to break in, as they are constructed from non-stretch denim, but I didn’t realize that the super tight fit I was seeing all over Instagram was partly due to so many of the photos being of newborn pants (as This Is The Way.). They do tighten up a little after a wash, but never like that first wear. And since I wear my jeans as many times as I can get away with between washes, it’s a moot point anyway.

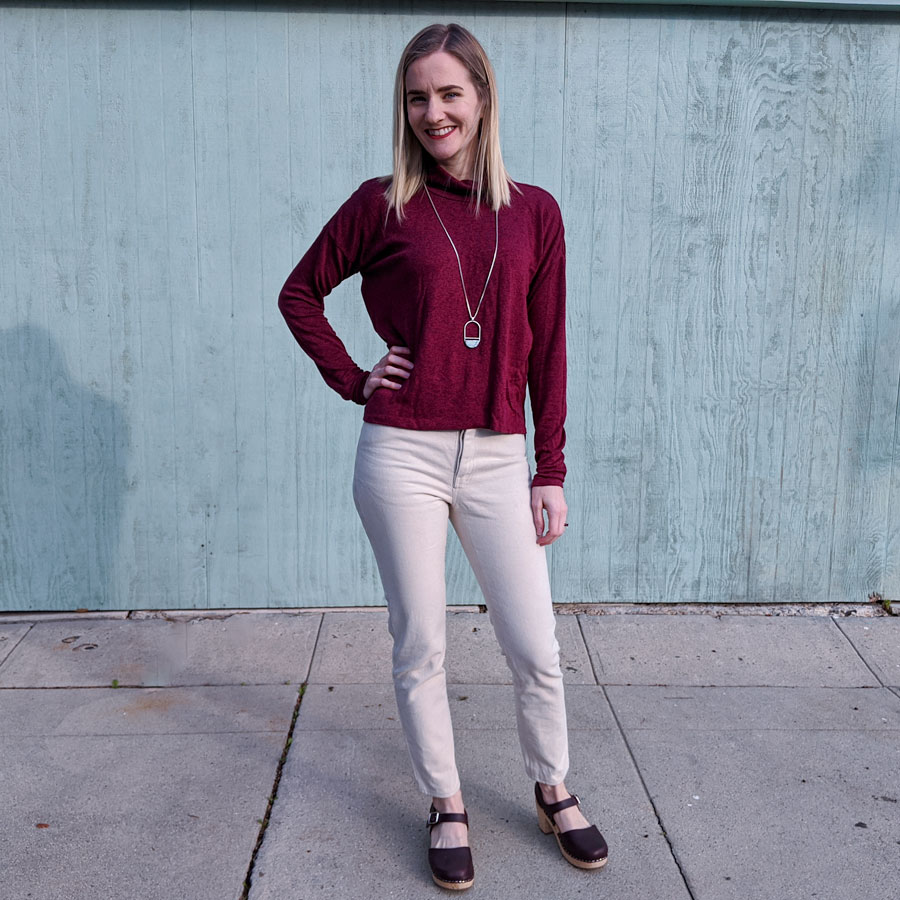
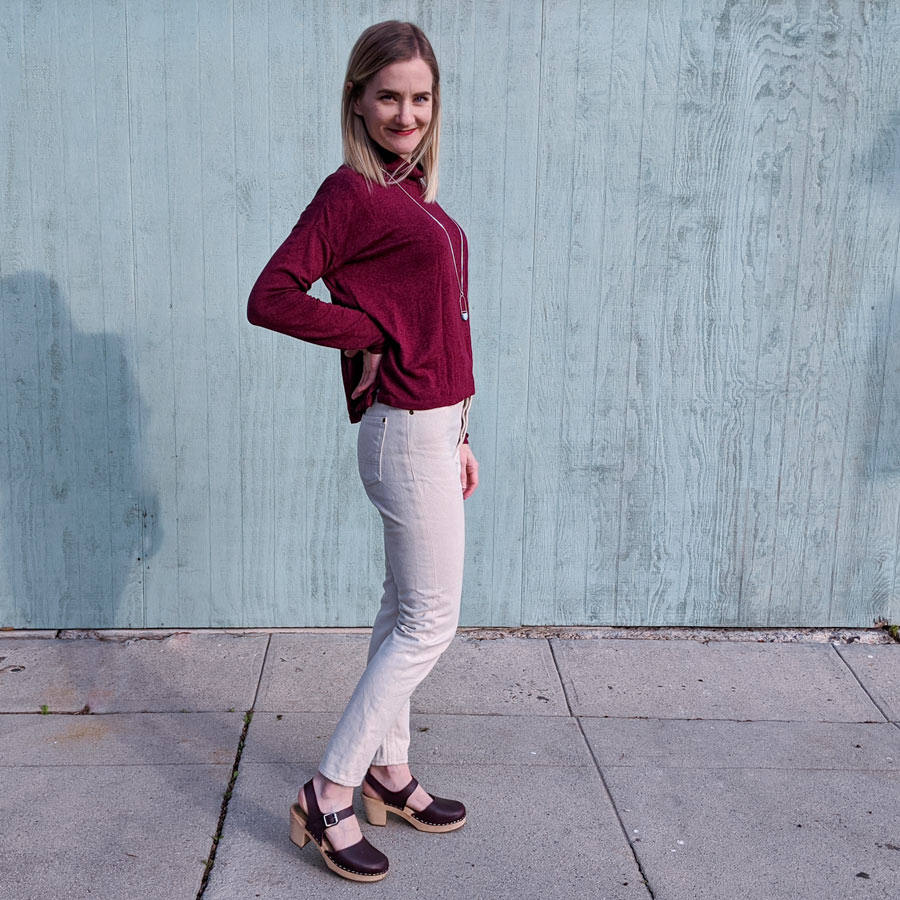
Anyway! Despite the minor changes in fit, I am still totally in love with these pants. They perfect shade of ecru, the hardware is a golden (!!) copper, and I didn’t have to adjust the waist to hip ratio at alllll (I am a 27″/37″).
I will admit that these pants were kind of an asshole in the last leg of construction, but nothing great is born without strife.
So what lessons did I learn over the course of these jeans?
1.) Top-stitched buttonholes are Not. Worth. It.
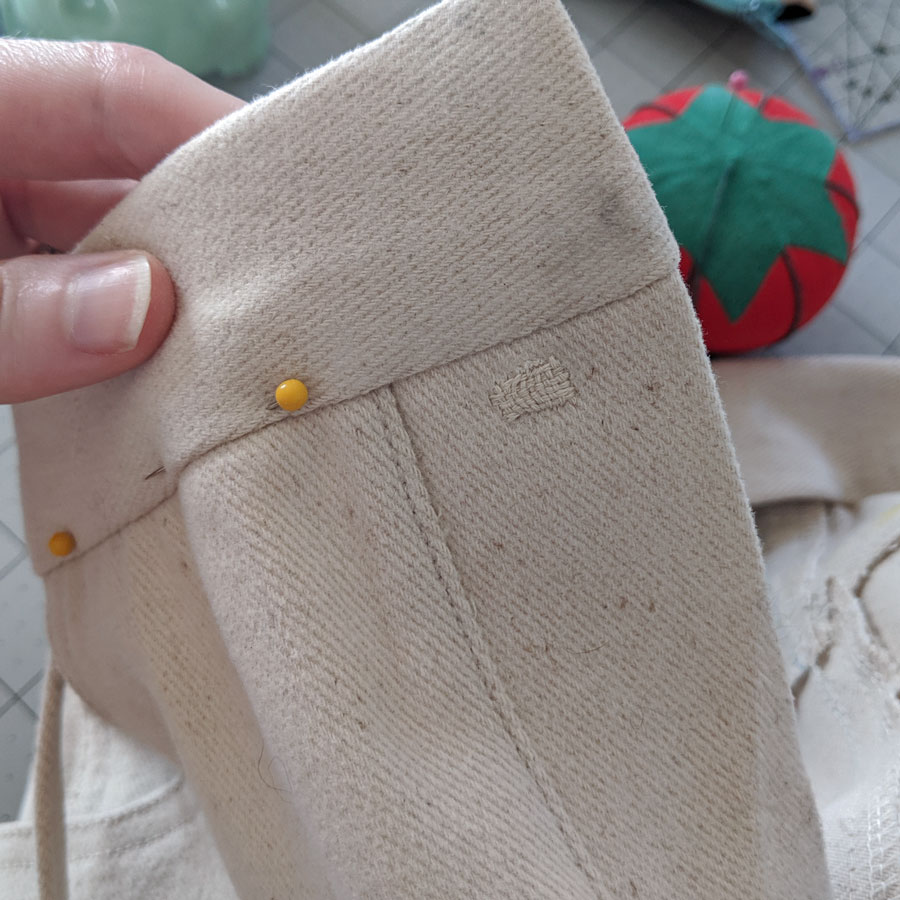
Good grief what a mess and a pain in the ass those turned out to be. My machine hated it, I hated it, and they look so terrible now that I will need to redo them by hand anyway. Stitching the waistband buttonhole went so awry (for reasons that are still unclear to me) that I had to get out my screwdriver and take apart the needle plate to get my pants out of my sewing machine. Yes, you read that correctly. My machine tried to eat my pants.
The thread underneath the plate was the biggest bird’s nest I’d ever seen (think: bald eagles must have lived there), that it actually broke my seam ripper trying to get through it.
And yes, you also read that correctly. After two years of heavy use – this was the project that finally broke my investment seam ripper (and by investment I mean, $10).
On top of, it the buttonhole threads immediately started to fray. Are they your standard, cute and barely-noticeable, pieces of thread? Nope. They are obnoxious and can’t-miss-them pieces of top-stitching thread.
Related question – when constructing a button fly, does anybody know which way the “top” of the buttonhole should face? Is it towards your body and the button? Or towards the outside of the pant?
2.) The correct number of Gutterman* top-stitching spools for one pair of jeans is three**.
*Yes I know the Mara brand is highly recommended but I’m not good at planning for thread ahead of a project. Therefore whatever is available at Joann is usually what I use. I’m hoping to get better about this in 2020 but it’s not likely.
**I may amend this number in the future now that I’ve renounced top-stitching buttonholes. But until further notice the number is three, because having to stop mid-project to go buy more thread is pretty aggravating.
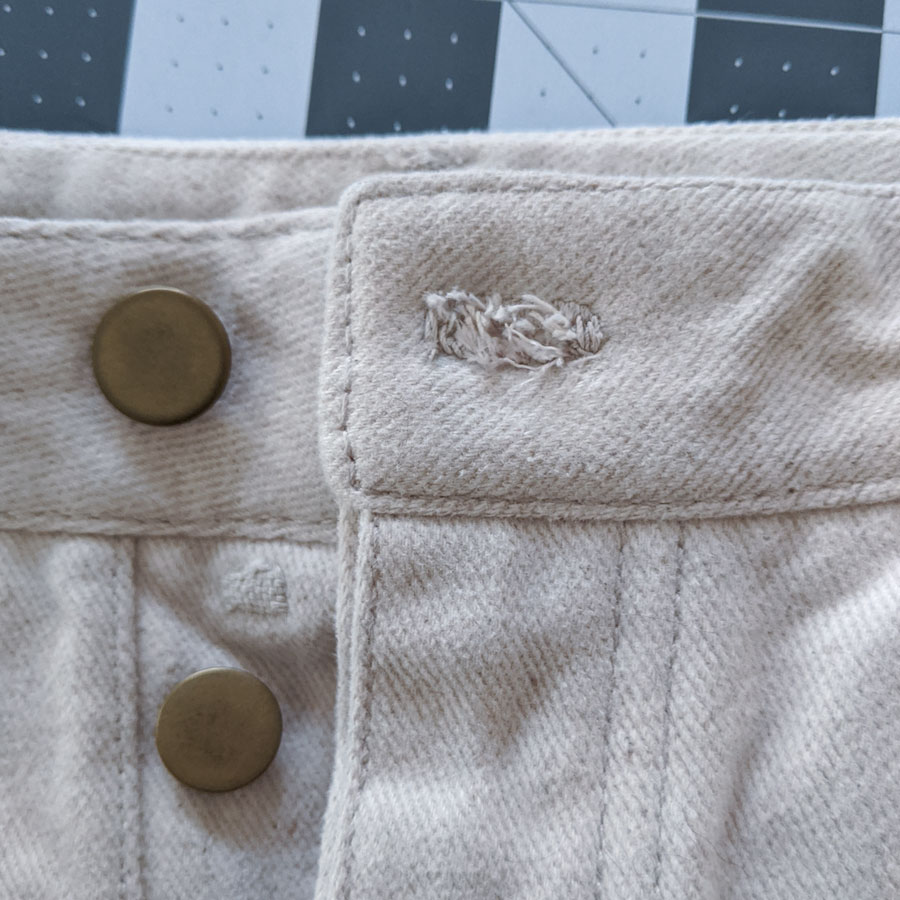
3.). Be very careful when hammering down your waistband. I repeat: BE VERY CAREFUL WHEN HAMMERING DOWN YOUR WAISTBAND.
Did you know that a woefully placed hammer can put a hole in your fabric? Yea, me neither.
Aside from the drama of the button fly (and it really felt like there was a lot of it), it was regular-sailing otherwise in making these pants.
To fit them, I first stay-stitched all of the normal pieces and then serged all of their edges so I wouldn’t have to deal with excess fraying. Per Lauren’s suggestion, I completed the construction of the zip and pockets first before basting together the rest of the seams. This made taking out the basting stitches so much easier, since it was only the waistband, the yokes, and the inseam/side seams to take out.
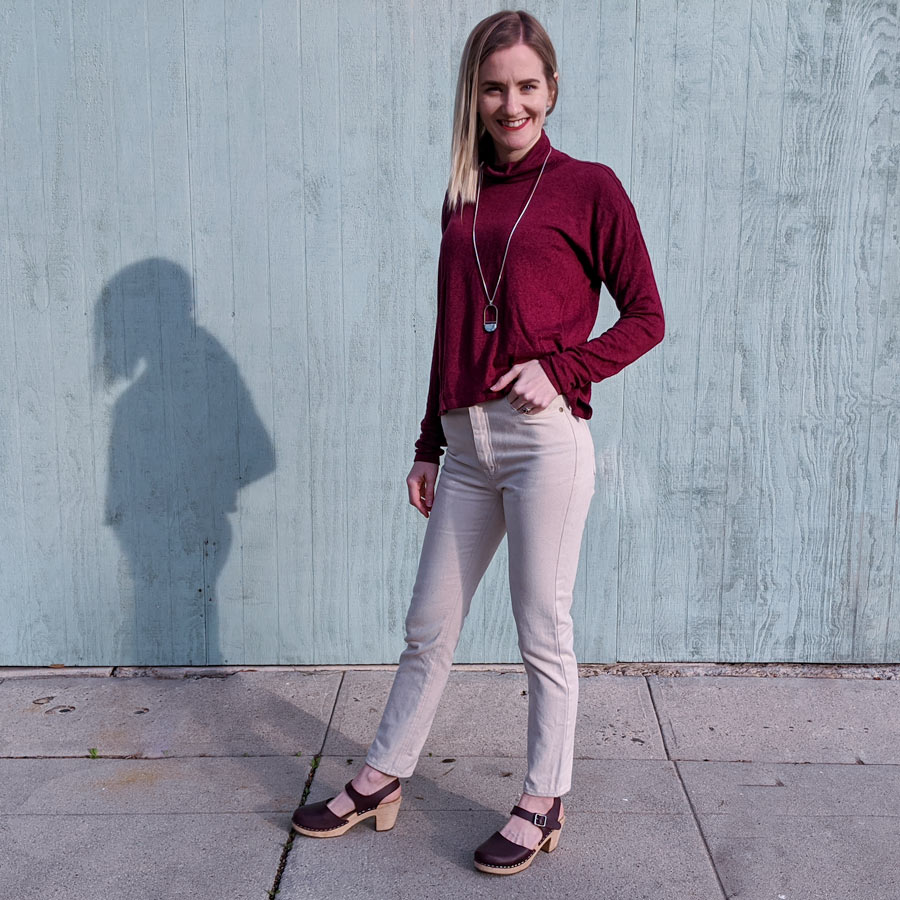
The fit was honestly pretty great straight out of the pattern. Apparently Megan Nielsen patterns are drafted for a larger waist-to-hip ratio, so this was the first time my measurements fell into a single pattern size. That in and of itself was exciting!!
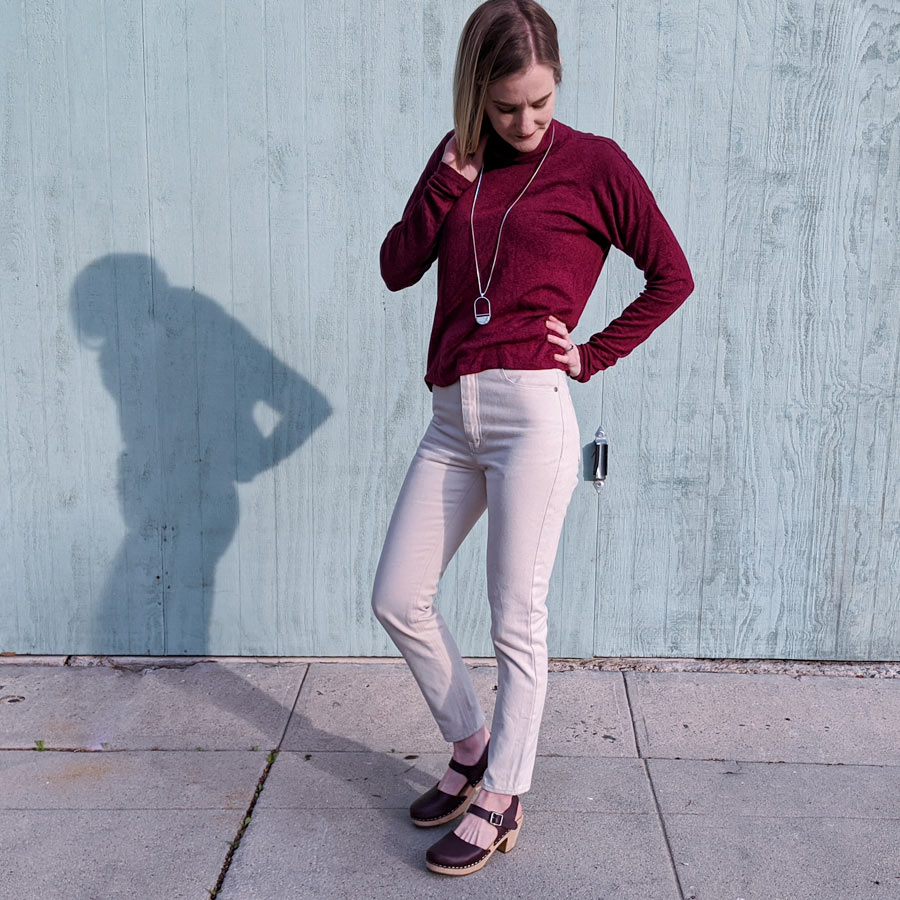
I did decide to shortened the front crotch by a quarter inch (same as I did for the Gingers), but otherwise I left the front of the pants alone. After wearing them this many times and seeing them in photographs however, there is still a bubble of extra fabric in the front that bothers me. Not enough to keep me from wearing them, but definitely something I’d like to address in the next pair.

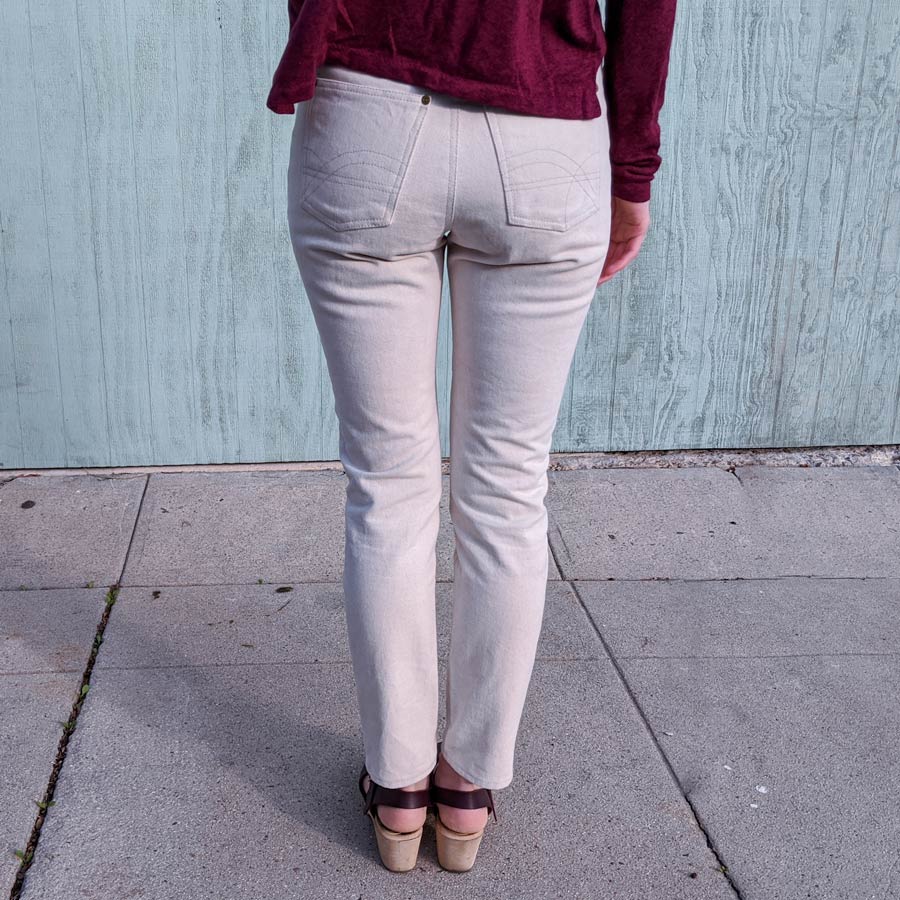
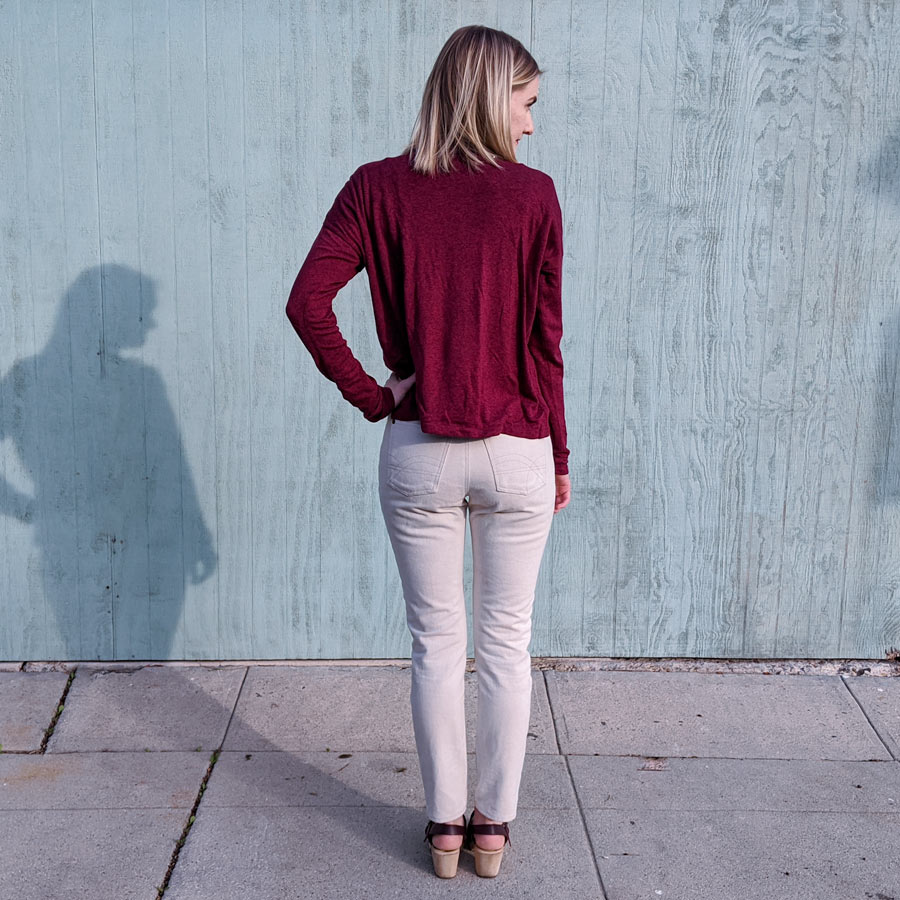
The main areas of trouble fit-wise were all on my backside – lots of wrinkles at the top of my thighs, and pooling fabric at the small of my back.
The sway back was the obvious adjustment to make, and to my surprise I found that when I pinched out the excess in the back yoke and leg pieces – it helped immensely with all the pooling that was happening at back of my legs too. Fitting guides typically recommend a low seat adjustment for those drag lines (which I tried to little avail with my Gingers) – but in my case I think it’s actually excess fabric falling down from the small of my back.
One small baste-fitting complaint: despite my best efforts to staystitch every possibly relevant seam before trying them on – my front pocket facings still stretched out and now don’t lay flat. How do y’all avoid this? Am I doomed to stretch out my pants every time I baste them??? Is there something I’m missing?

Since completing them, these pants have gotten a ton of wear. As I mentioned earlier, the first couple of wears were very tight, but they do start to stretch out and get pretty comfortable. I still avoid them if I know I will be sitting for long periods of time or eating copious amounts of food (I’m looking at you, Thanksgiving), but I’m not afraid to undo the top button if I need to either.
I love love LOVE the denim. Between the shape of the pant and the color of the fabric – I feel cute and put together every time I put these on. The legs are in the tapered view, and as much as I would like to try the other styles – I’m so enamored with these I may never get to it (except for the shorts which are on my Make Nine list this year).
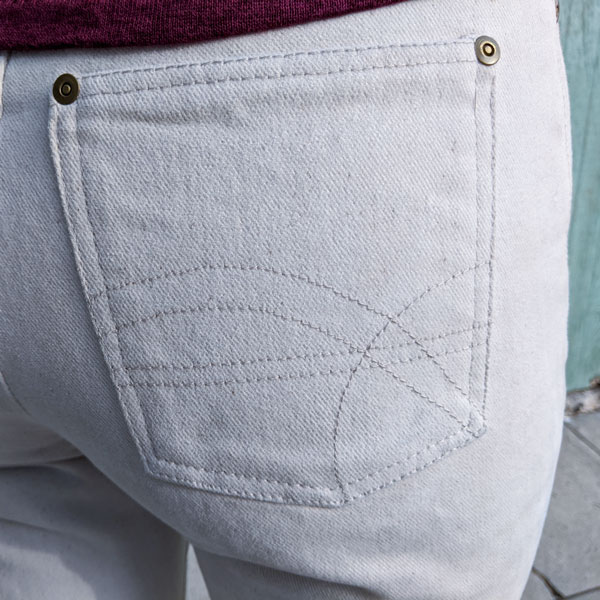
Also, can we talk about the back pockets? They might be my proudest & favorite part of the whole pants. I decided to experiment with the topstitching, and choose design #25 from the free collection by Closet Case Patterns. I never would have picked such a busy design for a high contrast pair of jeans – but in the monotone palette it’s subtle enough for my taste. It was such a fun detail to add, and I am in love with how it turned out.
Despite the hiccups and slight (or hammer-sized) imperfections of this garment, the soul-level victory of my Ginger jeans carried me through. Putting these together, I could see improvements already from my last pair of jeans, and this alone helped me let go of the need to get them just “right”. I am now on a tangible ~journey~ and this journey doesn’t end with these pair of pants! So I don’t mind if my pocket facings are a little stretched out, or the topstitched button holes didn’t work out – because they are just minor details that I will continue to improve on with time.

The Details:
- Fabric: 12oz Brushed Bull Denim from Blackbird Fabrics (2 meters)
- Pattern: Dawn Jeans by Megan Nielsen Patterns
- Size: 4, View A Tapered Legs
- Adjustments:
- Shorten Crotch 1/4″
- Sway Back Adjustment 5/8″ from CB Yoke and 5/8″ from CB Leg
- Total Cost: $71
- $32 for the fabric
- $8 for the jeans hardware kit
- $6 for topstitch thread (3 spools)
- $8 for seam ripper (yes, I’m counting that!)
- $17 for the pattern


Lia
Love love LOVE these. Wow, what an adventure finishing them though! I’ve broken a ton of needles but breaking a seam ripper is a next-level move, I bow down. And hammering them TO PIECES is pretty mighty too. 😉 I actually love the look of the mending though, beautiful texture and tone-on-tone!
Uggh should I buy this pattern? Looking at your pants makes me want to buy this pattern. But I don’t need it! Do I? I might.
Tonal topstitching is my favorite and yours is so NEAT!! <3
miranda
Hahaha, why thank you, thank you. It does feel like an accomplishment!
And yes! I’m in favor of you getting the pattern. 😂 It’s on the expensive side for a pattern, but it’s honestly great. Plus you get four legitimate views, so the re-sew value is high IMO.
Jess
I’ve had issues with the front pocket facings (and the yoke!) stretching out as well on two of the three Dawn jeans I’ve made. I thought it was an issue with the waistband being too short, but I measured the pattern pieces and the math added up, so I was definitely inadvertently stretching the pocket facings and yokes during construction! The most recent pair I made were fine, probably because the first thing I did was stay stitch and because I didn’t handle the pieces so much. I think for my other two pairs, I probably forgot to stay stitch or I handled the pieces too much 🙁 (Not saying you didn’t stay stitch but just wanted to share my front pocket facing sob travails!!)
miranda
Well on the one hand I’m glad to not be alone, but on the other hand sad for your fellow Dawns! I can’t remember if I stay stitched or not to be honest, but I know when I baste fitted them it wasn’t a problem, and then when I put them together for final construction it was. Did you baste fit yours too, or do you think it was just too much handling in general? I’ve seen the same issue on lots of other Dawns as well, so I wonder if they aren’t just prone to it because the fit is so tight to start.
I don’t want to not baste jeans because it’s so helpful . . . but now I’m wondering if maybe it’s not worth cutting two sets of pocket facings? One for fitting and one for final?? 🤔