It only took 36 days of quarantine to get me to start my first quilt (the Diamonds and Squares quilt), but here we are!

Last December I had a treat myself moment while visiting some in-laws up in Ventura, CA. There is a fantastic fabric shop up there called Superbuzzy (highly recommend it if you ever in the area), and I always make it a point to stop there when I’m in town. They carry primarily quilting cottons, and the selection is incredible (this is no Joann).

Although I usually stick to purchasing garment-appropriate fabrics while I’m there (and just admire the rest), this time I had a gift card in hand and decided to buy materials to start a quilt.
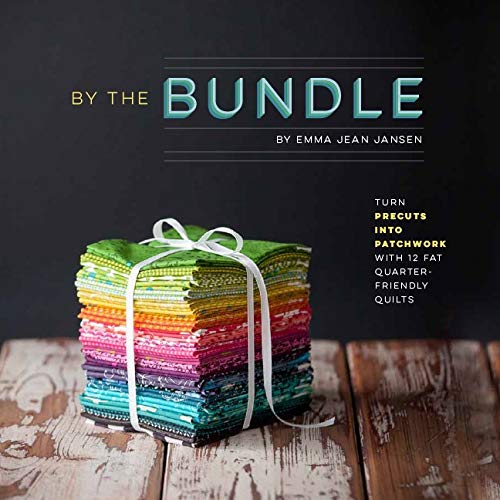
After at least twenty minutes of browsing, I grabbed my favorite fat quarter bundle and checked out. Being the complete newbie that I am, I also picked up a copy of By the Bundle to help me along. This book contains a bunch of quilting patterns designed specifically for fat quarter bundles, and I figured this was an okay place to start considering I have no idea what I’m doing. You will come to see that the general theme of this quilt is: Wingin’ It.
So – that was back in December, and here we are in April. Both the fat quarter bundle and the book have been sitting in plain sight in my sewing room ever since. On the back burner but not forgotten! And with COVID-19 upon us, something in me was itching to finally start.
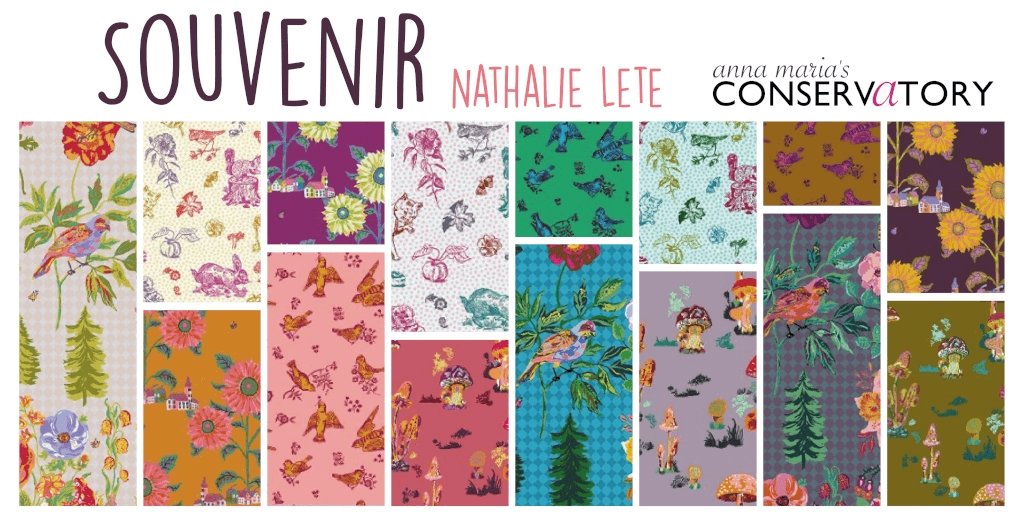
And whew, what a treat opening my fabrics was. If I had more expendable income, I would 100% sign up for a fat quarter subscription service. The prints were all adorable, and there were 15 of them! 15!! It was both a bite-size and luxurious fabric haul.
Unfortunately, I didn’t take photos of the fat quarters while I opened them (I was too excited, and it was dark.). But luckily, most of these fabrics are still online, so you can admire the original swatches from the comfort of your monitor:

Conservatory: Souvenir – On My Way – Flour 
Conservatory: Souvenir – On My Way – Jewel 
Conservatory: Souvenir – On My Way – Water 
Conservatory: Souvenir – Birds and Love – Jade 
Conservatory: Souvenir – Birds and Love – Gold 
Conservatory: Souvenir – Birds and Love – Cheeky 
Conservatory: Souvenir – In My Garden – Perfume 
Conservatory: Souvenir – In My Garden – Cream 
Conservatory: Souvenir – In My Garden – Aqua 
Conservatory: Souvenir – Sunny Village – Sea 
Conservatory: Souvenir – Sunny Village – Maize 
Conservatory: Souvenir – Sunny Village – Aubergine 
Conservatory: Souvenir – Beautiful Mushrooms – Lipstick 
Conservatory: Souvenir – Beautiful Mushrooms – Heather 
Conservatory: Souvenir – Beautiful Mushrooms – Army
Of the twelve options included in my book, I ultimately decided to go with the Diamonds and Squares quilt pattern. It is both relatively simple (no round shapes!), and print-forward:

Once I started, I discovered very quickly that I needed to let go of the idea of having a “perfect” quilt. I’m thankful this realization came early, because it’s made the whole process a lot more playful and enjoyable. See above: Wingin’ It.
The first hiccup was that I immediately cut my first fat quarter incorrectly. I did this by trying to true the grainline before cutting my squares, and consequently I ended up almost an inch short on four of my pieces. Luckily I caught this quickly, and realized that grainlines don’t really matter in quilt pieces. Since they aren’t draping on your body, it’s far more important to maximize what you have.
To make up for theses short pieces, I added a seamline to get to the correct size. I don’t think this is quilting-kosher, but it worked!

The second hiccup was that I only had 15 fat quarters in my bundle, and the pattern calls for 18. Given that I’m not a quilter, and almost all of the quilting cotton I had in my stash just went towards face masks – this was a bit of a dilemma.
However! Once I started adding seamlines to those first miscut pieces, it was a slippery slope from there. I figured, why not use the same technique to get a little more mileage out my existing fat quarters? I still had about 3″ on each selvage – not enough for a full 4.5″ square, but enough that I could get two more pieces out of each if I added seamlines. This bought me two fat quarters worth of fabric, thus bringing my deficit down to just one fat quarter.

Again, I didn’t have much in my stash that was appropriate. The only thing I had close to working (in terms of color and subject matter) was this cotton that my mom purchased for me in Japan last year. In the context of the quilt, I think it works! I mean, it IS a quilt, after all.

Of course, fudging my fabric means that I have 8 (of 72) rather chaotic blocks. Some purists might say that my quilt top is hot a mess as a result – but isn’t that kind of what a quilt is? An organized hot mess? See again: Wingin’ It.

The fabric I chose for my “diamonds” is a yard-dyed linen/cotton that, coincidentally, I also picked up at Superbuzzy, except two or three years ago. It was my first “quality” fabric purchase (at more than $10 a yard, lol), and I only bought about a yard because I didn’t yet have a good sense for garment fabric requirements (and I’m cheap). As a result, it’s been in my stash ever since – but I’m very happy to have repurposed it for this quilt!

As for the actual sewing – woo boy! I’ve discovered that quilting involves a LOT of tiny seams. And tiny squares. And tiny seam allowances. The first round of sewing, I had 288 diamonds to attach to my square pieces. I can definitely say that no garment I’ve ever sewn has come close to that many seams.

But an interesting thing happens with quilting where you start to pick up momentum as you go along. Even though I had 288 seams the first round of sewing & pressing – the next round it was only 144. And then when I put my blocks together, that was only 72 seams (I realize that “only 72” sounds completely ridiculous – but it really did feel like a breeze by that point!). After my blocks were done, the quilt top came together really quickly.

As an aside, trying to iron that many seams at once definitely took a toll on my wrist (and my arm! I burned myself! 🤬). I had to stop lifting my iron up at all between seams to make it manageable, and I’m now fantasizing about a fancy Oliso iron. The “lift” feature seemed real gimmicky until I took up this quilt. Again, future expendable income goals.

Anywho! My 72 blocks are all done and sewn together now, and it’s been a satisfying process until this point. There is more repetition and less problem-solving in quilt making, and it’s been a nice break for my brain to have a long project like this.

What comes next? I have no freakin’ idea! Something about batting in the middle, a quilt back on the other side, and then binding it all together. It’s all very mysterious to me, so I’m taking it one step at time, y’all.
As I currently have no batting or binding at the moment, finishing this quilt will be put on hold for a few weeks while I source those items and figure out what I need. Normally project breaks make me very uncomfortable, but it’s a welcome pause for this one. I’m about 20 hours in at this point (with no clue how long the rest will take), and I’m ready to sew a few garments before coming back.


Lia
I think this is terrific, and made even better by your extra seams – it just holds so true to the history of quilting and making do with what you’ve got! I’m super impressed. Good luck with the finishing, I’ll be jealous of your finished quilt but not of the steps you have left. 😀
miranda
Thanks Lia! I am also not jealous of the steps I have left – I suspect the best parts are behind me. 😂
Tonia Van Dyk
I’ve just sandwiched my version of this quilt – yours looks AMAZING!! I love the fabric combination you used.
miranda
Thanks Tonia! I’d love to see your version. I still need to sandwich mine, eek!